Messaging
<span id="topic-1" style="padding-top:40px;">Spaces and Teams</span>
In the Webex app, your interactions are taking place in spaces and teams, where you can send messages, make calls, have video meetings, and share files and whiteboards. A space might be a direct message space, a space with a small group, or a space that is part of a larger team, created in Webex. Let’s break these down:
- • Direct Messages - A message sent directly to one person. Direct messages remain between two people. You cannot add other people to the conversation later.
- • Spaces - Spaces work well for a group of people working on a specific topic. You might also see these referred to as standalone spaces.
- • Teams - If your original intention changes and a space outgrows its original purpose, you can create a team and then move a space into a team. Teams are typically used when working on a large project with people across multiple departments.
<span id="topic-2" style="padding-top:40px;">Create a Space</span>
To collaborate with a group in Webex, you can create a space. Spaces work best for a group of people collaborating on a specific topic or project. In a space, you can send messages, make calls, have video meetings, share files, and use whiteboards.
If your scope expands from the original intention of the space, it might be time to create a team and move the space into a team. See Create a Team for more information.
- 1. To create a space, in the app header, click the Plus icon.
- 2. Select Create a space.

- 3. Enter the name for the space.
- 4. Enter the email address or name for each person you want to add to the space.

- 5. Click Create.
<span id="topic-3" style="padding-top:40px;">Create a Team</span>
Creating a team in Webex can help you collaborate and stay organized. Teams are especially helpful when you’re working on a large project with team members across multiple departments.
Alternatively, if you’re organizing a small office celebration, you might only need a standalone space for this. For more information on standalone spaces, see Create a Space.
To create a team:
- 1. Click the Teams tab.
- 2. Click the Plus icon to create a team.
- 3. Enter the Name of your team. If you’d like, you can also enter a description.

- 4. Add people to the team by entering their name or email address and then selecting them from the drop-down list.
- 5. Click Create.
- 6. Once you have created a team, you can add smaller spaces within it. To create spaces within a team, click Create a space.
Note: Every team has at least one team space, General. People added to the team are automatically added to the General space.
<span id="topic-4" style="padding-top:40px;">Send a Message</span>
Messages in Webex are where you chat with coworkers, exchanging content and ideas. You may send a message directly to a coworker or to a space you created. To send a message directly to a coworker:
- 1. Select a person from your spaces list.
- 2. Click the message area and then type your message. You can include files, emojis, or animated GIFs, and also add formatting or markdown to make your messages stand out or be easier to read.

- 3. Press Enter to send your message.
- 4. You will be notified when a new message arrives by a pop-up window in the upper, right corner of your screen.
To open a message:
- 1. Click on the pop-up notification.
- 2. This brings you directly to the message space.
or
- 3. From your People Spaces list area, locate the bolded items also with a dot. This shows you have a new message from a coworker or space.
- 4. Click on the bolded space to access the new messages.
<span id="topic-5" style="padding-top:40px;">Send a File</span>
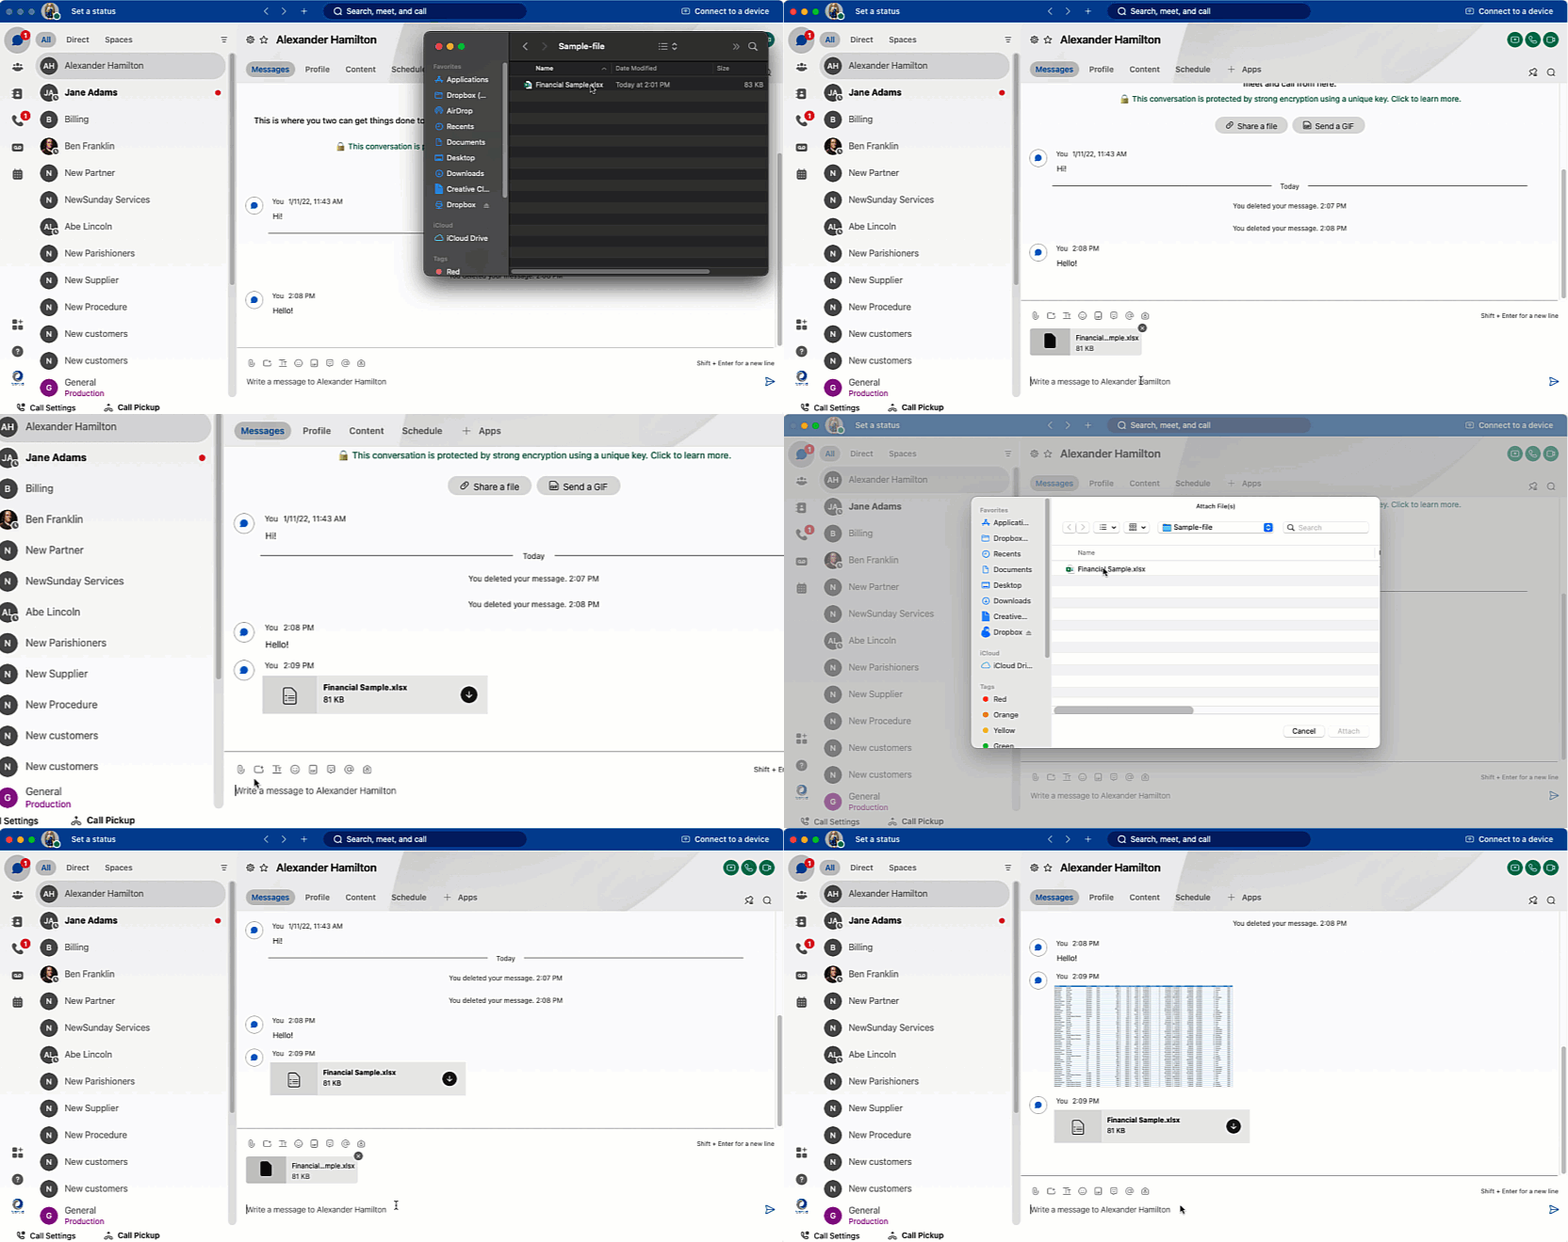
You can share most types of files, with the largest file size being 2 GB. You can also preview documents without downloading them first. Acceptable file types: .doc, .docx, .gif, .jpeg, .pdf, .png, .ppt, .pptx, .xls, and .xlsx.
A few ways to share or send a file:
- 1. Drag and drop the file into the message area.
- a. Press Enter to send the file.
- 2. Click the attachment icon within the message area.
- a. This will bring up your system dialog box where you can select and upload the file.
- b. Press Enter to send a file.

- 3. You can click Screen capture to select a part of your screen to capture.
- a. Press Enter to send the file.
<span id="topic-6" style="padding-top:40px;">Share Your Screen Without Calling</span>
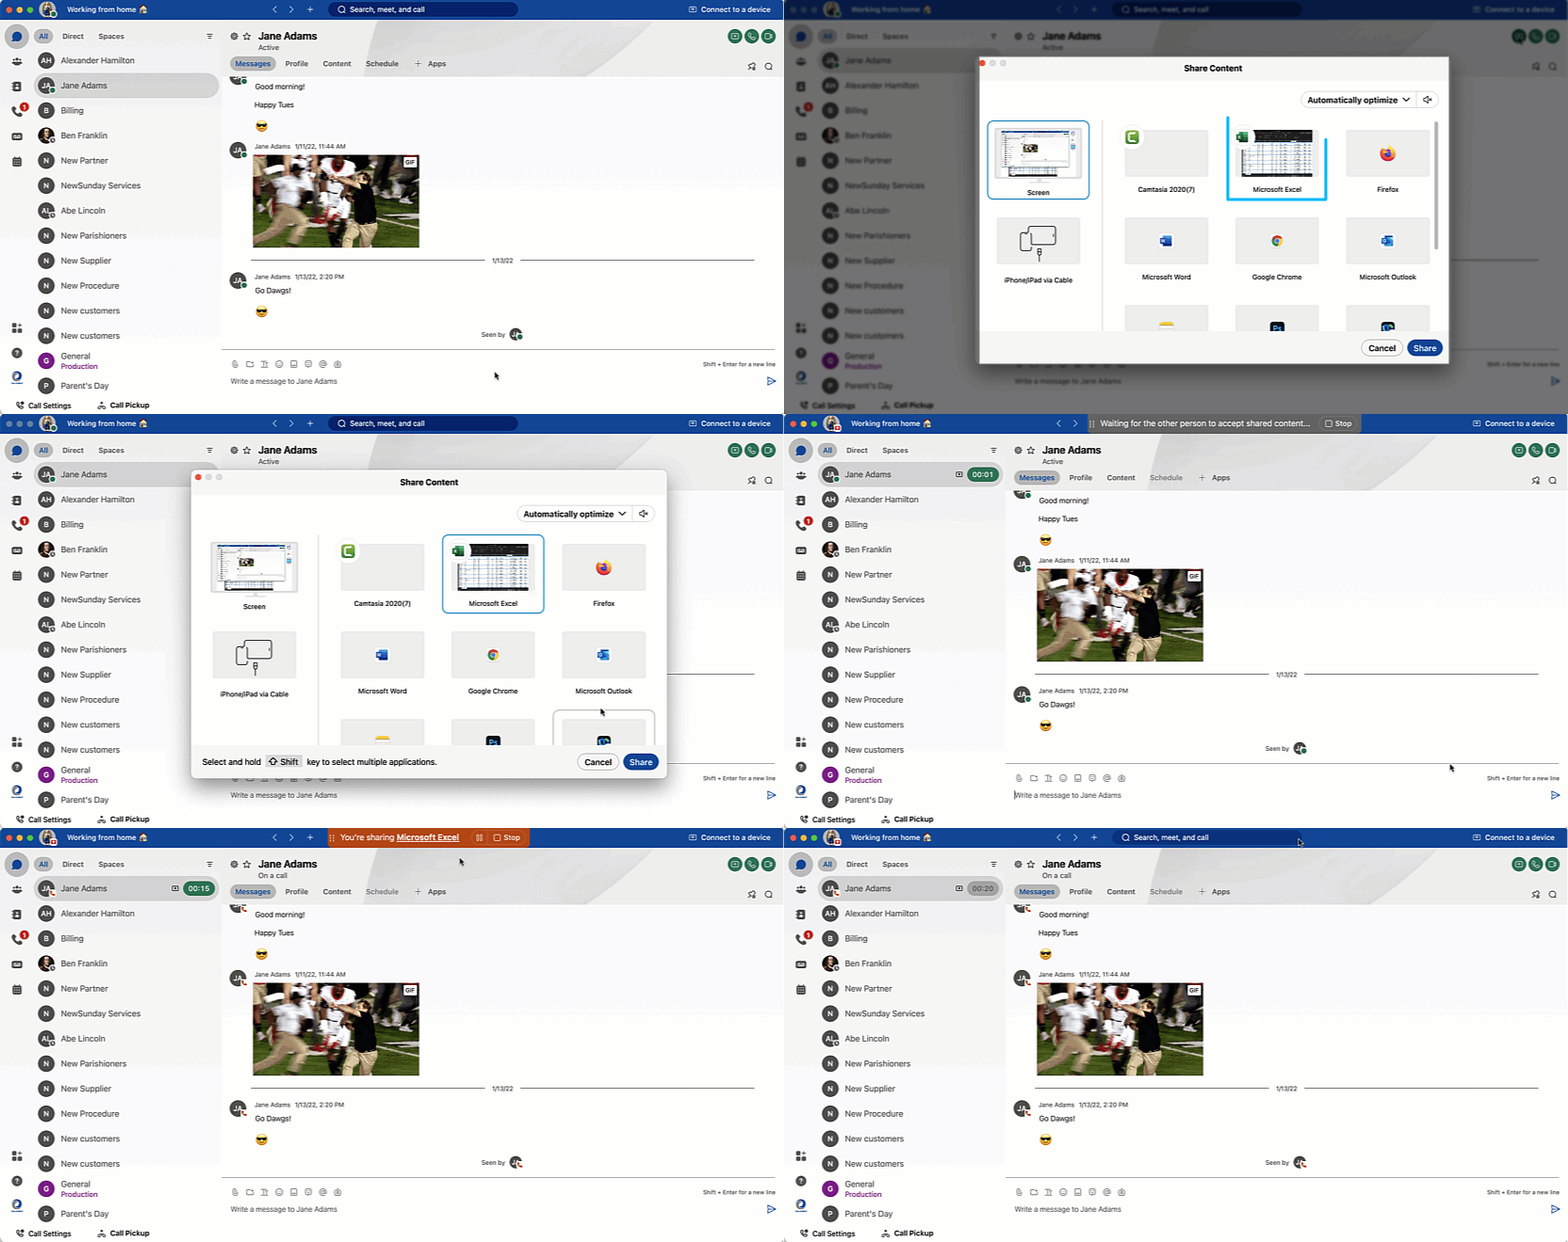
You can easily share your screen without being in a meeting or on a call. This can be helpful if you just need to demonstrate something quickly in a one-on-one chat.
- 1. While in a one-on-one message, click the Share content icon.
- 2. Choose whether you would like to share a screen or a specific application.
- 3. The person you are sharing with is prompted to accept the screenshare.
- 4. To stop sharing, click Stop at the top of the screen share window.

<span id="topic-7" style="padding-top:40px;">Translate Messages in Spaces</span>
Requires ProConnect Meetings Plus
Enhance communication effectiveness and overcome language barriers in your direct or group spaces using the translation feature. Set your preferred language in your settings to translate individual messages or all messages in real time within your spaces.
To translate messages in a space from any language to your desired language, select your language in settings.
- In the app, go to Settings .
- Select Messaging > Message translation.
- Select your language from the drop-down list, and click Save.
Translate a message
Translate any individual message in a space to a selected language.
- In a space, hover on a message and click More actions > Translate message.
For spaces with multiple languages, or spaces where you need to translate in real time, start a live translation.
- At the top of the space, select Space settings menu > Start live translation.
After a few seconds, the app translates all messages in the space to your selected language.
<span id="topic-8" style="padding-top:40px;">Rewrite Messages with AI Assistant</span>
Boost communication and collaboration with your team using AI-powered message rewrites. AI Assistant analyzes your message and offers suggestions to refine style, tone, and content quality, enhancing your effectiveness in communication.
- 1. Select a space, go to the message area, and type your message.
- 2. Click Rewrite message to open the rewrite window.
AI Assistant analyzes your message and provides options to fix mistakes, improve spelling and grammar, update format and style, and change the message tone.
- 3. Choose from the available drop-down options, and click Apply to generate a preview.
Click the refresh icon to generate more preview versions. To go back and forward between versions, click the left and right arrows.
- 4. When you’re satisfied with a new version, click Update message, or to discard all changes click Cancel. Then, click Enter to send the updated message

<span id="topic-9" style="padding-top:40px;">Generate Space Summaries </span>
Requires ProConnect Meetings Plus
When you're occupied or returning from an absence, staying updated across all your spaces can be daunting. AI Assistant can create space summaries to swiftly bring you up to speed on missed messages and conversations within each space. Stay informed about decisions, key points, and stay current with ongoing discussions at a glance.
- From the desktop app header, click AI Assistant. Then, select a space from your spaces list.
- In the Cisco AI Assistant panel, select from:
- Summarize—summarize the conversation in the space. Choose from
- 1 week—conversation from the last week.
- 1 day—conversation from the last day
- 1 hour—conversation from the last hour.
- Summarize unread—summary of unread messages in the space.
Click Stop generating to cancel the summary.
Your summaries are displayed in the AI Assistant panel. Click the space name in the summary title, to quickly return to that space.
Summaries remain in the AI Assistant panel until you restart, or sign out of the app.
- Click Ask me anything about recent activity to ask AI Assistant questions about conversations, or content, discussed in the space.
